Skip i'r prif gynnwys

Sut i fewnosod rhes newydd wag yn awtomatig gan Command Button yn Excel?

Mewn llawer o achosion, efallai y bydd angen i chi fewnosod rhes newydd wag i safle penodol o'ch taflen waith. Yn yr erthygl hon, byddwn yn dangos i chi sut i fewnosod rhes newydd wag yn awtomatig trwy glicio ar Botwm Gorchymyn yn Excel.

Mewnosod rhes newydd wag yn awtomatig gan Command Button


Mewnosod rhes newydd wag yn awtomatig gan Command Button

Gallwch redeg y cod VBA canlynol i fewnosod rhes newydd wag trwy glicio Botwm Gorchymyn. Gwnewch fel a ganlyn.

1. Yn gyntaf, mae angen i chi fewnosod Botwm Gorchymyn. Cliciwch Datblygwr > Mewnosod > Botwm Gorchymyn (Rheoli ActiveX). Gweler y screenshot:

2. Yna tynnwch Botwm Gorchymyn i mewn i'r daflen waith y mae angen i chi ychwanegu rhesi newydd, cliciwch ar y dde ar y Botwm Gorchymyn a chlicio Eiddo o'r ddewislen clicio ar y dde.

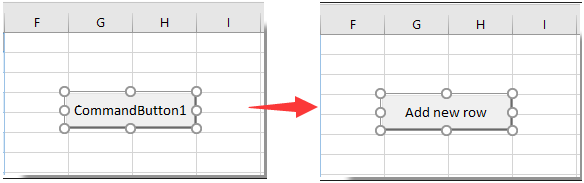
3. Yn y Eiddo blwch deialog, nodwch destun arddangos y Botwm Gorchymyn yn y Geiriad blwch o dan y Categoreiddio tab, ac yna cau'r blwch deialog.

Gallwch weld bod testun arddangosedig y Botwm Gorchymyn yn cael ei newid fel y dangosir isod.

4. De-gliciwch y Botwm Gorchymyn eto, ac yna cliciwch Gweld y Cod o'r ddewislen clicio ar y dde.

5. Yna y Microsoft Visual Basic ar gyfer Ceisiadau ffenestr, disodli'r cod gwreiddiol gyda'r cod VBA isod yn y Côd ffenestr.

Cod VBA: Mewnosod rhes newydd wag yn awtomatig gan Botwm Gorchymyn

Private Sub CommandButton1_Click()
    Dim rowNum As Integer
    On Error Resume Next
    rowNum = Application.InputBox(Prompt:="Enter Row Number where you want to add a row:", _
                                    Title:="Kutools for excel", Type:=1)
    Rows(rowNum & ":" & rowNum).Insert Shift:=xlDown
End Sub

Nodyn: Yn y cod, CommanButton1 yw enw'r Botwm Gorchymyn rydych chi wedi'i greu.

6. Gwasgwch Alt + Q allweddi ar yr un pryd i gau'r Microsoft Visual Basic ar gyfer Ceisiadau ffenestr. A diffodd y Modd Dylunio O dan y Datblygwr tab.

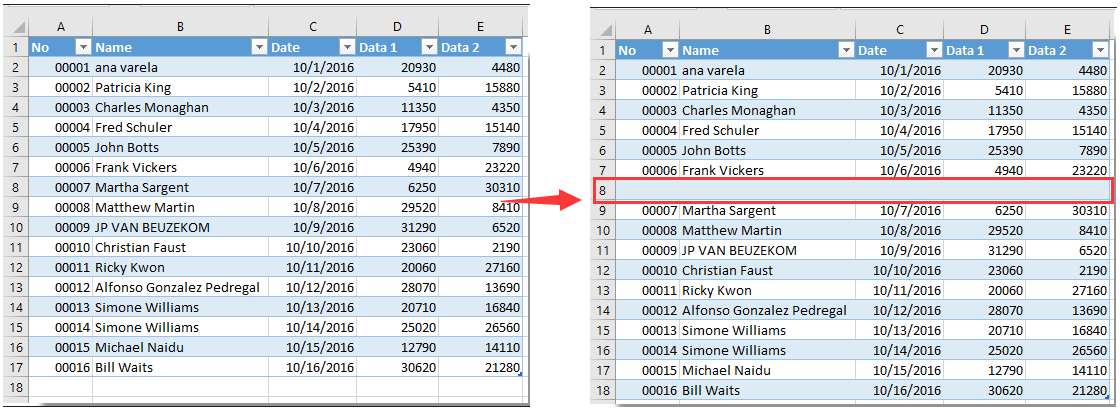
7. Cliciwch y Botwm Gorchymyn a fewnosodwyd, ac a Kutools ar gyfer Excel blwch deialog yn ymddangos. Rhowch rif rhes penodol lle rydych chi am ychwanegu rhes newydd wag, ac yna cliciwch ar y OK botwm. Gweler y screenshot:

Yna mae'r rhes newydd wag yn cael ei mewnosod mewn safle penodol o'ch taflen waith fel y dangosir y llun isod. Ac mae'n cadw fformatio celloedd y gell uchod.


Erthyglau perthnasol:

Offer Cynhyrchiant Swyddfa Gorau

🤖 Kutools AI Aide: Chwyldro dadansoddi data yn seiliedig ar: Cyflawniad Deallus   |  Cynhyrchu Cod  |  Creu Fformiwlâu Personol  |  Dadansoddi Data a Chynhyrchu Siartiau  |  Invoke Swyddogaethau Kutools...
Nodweddion Poblogaidd: Darganfod, Amlygu neu Adnabod Dyblygiadau   |  Dileu Rhesi Gwag   |  Cyfuno Colofnau neu Gelloedd heb Colli Data   |   Rownd heb Fformiwla ...
Super-edrych: VLookup Meini Prawf Lluosog    VLookup Gwerth Lluosog  |   VLookup Ar Draws Taflenni Lluosog   |   Edrych Niwlog ....
Rhestr gwympo Uwch: Creu Rhestr Gollwng yn Gyflym   |  Rhestr Gollwng Dibynnol   |  Rhestr Gollwng Aml-ddewis ....
Rheolwr Colofn: Ychwanegu Nifer Penodol o Golofnau  |  Symud Colofnau  |  Toglo Statws Gwelededd Colofnau Cudd  |  Cymharwch Ystodau a Cholofnau ...
Nodweddion dan Sylw: Ffocws ar y Grid   |  Golwg Dylunio   |   Bar Fformiwla Mawr    Rheolwr Llyfr Gwaith a Thaflen   |  Llyfrgell Adnoddau (Testun Auto)   |  Dewiswr Dyddiad   |  Cyfuno Taflenni Gwaith   |  Amgryptio/Dadgryptio Celloedd    Anfon E-byst trwy Restr   |  Hidlo Super   |   Hidlo Arbennig (hidlo mewn print trwm/italig/strikethrough...) ...
15 Set Offer Gorau12 Testun offer (Ychwanegu Testun, Dileu Cymeriadau,...)   |   50 + Siart Mathau (Siart Gantt,...)   |   40+ Ymarferol Fformiwlâu (Cyfrifwch oedran yn seiliedig ar ben-blwydd,...)   |   19 mewnosod offer (Mewnosod Cod QR, Mewnosod Llun o'r Llwybr,...)   |   12 Trosi offer (Rhifau i Eiriau, Trosi arian cyfred,...)   |   7 Uno a Hollti offer (Rhesi Cyfuno Uwch, Celloedd Hollt,...)   |   ... a mwy

Supercharge Eich Sgiliau Excel gyda Kutools ar gyfer Excel, a Phrofiad Effeithlonrwydd Fel Erioed Erioed. Kutools ar gyfer Excel Yn Cynnig Dros 300 o Nodweddion Uwch i Hybu Cynhyrchiant ac Arbed Amser.  Cliciwch Yma i Gael Y Nodwedd Sydd Ei Angen Y Mwyaf...

Disgrifiad


Mae Office Tab yn dod â rhyngwyneb Tabbed i Office, ac yn Gwneud Eich Gwaith yn Haws o lawer

  • Galluogi golygu a darllen tabbed yn Word, Excel, PowerPoint, Cyhoeddwr, Mynediad, Visio a Phrosiect.
  • Agor a chreu dogfennau lluosog mewn tabiau newydd o'r un ffenestr, yn hytrach nag mewn ffenestri newydd.
  • Yn cynyddu eich cynhyrchiant 50%, ac yn lleihau cannoedd o gliciau llygoden i chi bob dydd!
Comments (26)
No ratings yet. Be the first to rate!
This comment was minimized by the moderator on the site
Bedankt voor je uitleg. Ik heb de formule toegepast maar bekom dat ik maar 1 lijn kan toevoegen. Daarna laat de knop het niet meer toe en moet ik eerst mijn toegevoegde rij verwijderen. Is er een manier om dit aan te passen?
This comment was minimized by the moderator on the site
Is there a way to make to row inset always below the last entry?
This comment was minimized by the moderator on the site
How do I do the opposite of this and create a button that will delete a row?
This comment was minimized by the moderator on the site
Hi Big Ant,

Here's the modified code to delete a specified row when the Command Button is clicked:


Private Sub CommandButton1_Click()
'Updated by Extendoffice 20230817
    Dim rowNum As Integer
    On Error Resume Next
    rowNum = Application.InputBox(Prompt:="Enter Row Number which you want to delete:", _
                                    Title:="Kutools for excel", Type:=1)
    If rowNum <> 0 Then
        Rows(rowNum).Delete Shift:=xlUp
    End If
End Sub
This comment was minimized by the moderator on the site
Criei uma linha e nomeei como spotB,
Mudei a altura da linha para 0,01 para ocultá-la (apenas por estética).
Criei um botão:
Application.Goto Reference:="spotB"
Selection.EntireRow.Insert

Problema resolvido.

Obrigado pelos códigos a Mah e crystal, mas eu tinha 8 títulos para separar, cada um inserindo linhas quando necessário ao usuário, e não queria nenhuma pergunta sobre quantidade de linhas, os usuários não leem perguntas e clicam logo em OK, depois reclamam...
This comment was minimized by the moderator on the site
... Testei os códigos acima, mas, como se trata de pessoas que vão usar, não é viável os box que pedem a linha e a quantidade, não dá...
This comment was minimized by the moderator on the site
Caros colegas, após pesquisar (bastante) na net não consegui encontrar um atalho, comando, código, nada, nada, que eu possa usar para inserir em uma macro APENAS uma forma de inserir uma linha ABAIXO da célula ativa. Isto porquê se eu gravar o endereço da célula, ele não muda, fica sempre na mesma célula e as seguintes não vão ficar corretamente abaixo, e se eu usar um endereço de célula fixo, a linha tem que ser inserida acima, mas não formata da forma desejada, que seria o formato das linhas de cima.

Acho que o código existe, só não encontro, já tentei várias formas, selecionando um fixo, subindo uma linha e pedindo para inserir após, mas as seguintes não funcionam de acordo.

Alguém poderia me ajudar?
This comment was minimized by the moderator on the site
Hi

I used the code but wanted to add rows with formulas, therefore I added the last line to be able to add the rows with formulas.
However, in my excel file and in column "F" I have a text which can be entered manually and would be different in different cases. Therefore, I would like to add rows below the reference row with keeping the formulas and values in all cells except the cell from column "F" which I would like to be copied as blank!
Could you please help me with what should I add to the underneath code to be able to have the cells of column "F" blank whenever I add a row with this code?
thanks in advance!

Private Sub CommandButton1_Click()
Dim xIntRrow As Integer
Dim rowNum As Integer
On Error Resume Next
rowNum = Application.InputBox(Prompt:="Enter Row Number where you want to add a row:", _
Title:="Kutools for excel", Type:=1)
xIntRrow = Application.InputBox(Prompt:="Type in the number of rows you want to insert", _
Title:="Kutools for excel", Type:=1)
Rows(rowNum + 1 & ":" & rowNum + 1).EntireRow.Resize(xIntRrow).Insert Shift:=xlShiftDown
Rows(rowNum).Resize(xIntRrow + 1).FillDown

End Sub
This comment was minimized by the moderator on the site
Hi Mah,
The following VBA code may do you a favor. Please give it a try. Thank you.

Private Sub CommandButton1_Click()
'Updated by Extendoffice 20220707
    Dim rowNum As Integer
    Dim xRg1, xRg2 As Range
    
    On Error Resume Next
    
    rowNum = Application.InputBox(Prompt:="Enter Row Number where you want to add a row:", _
                                    Title:="Kutools for excel", Type:=1)
    
    Rows(rowNum & ":" & rowNum).Insert Shift:=xlDown
    Rows((rowNum - 1) & ":" & (rowNum - 1)).Copy
    Rows(rowNum & ":" & rowNum).Select
    Selection.PasteSpecial Paste:=xlPasteAll, Operation:=xlNone, SkipBlanks:= _
        False, Transpose:=False
    Range("F" & rowNum).Value = ""
End Sub
This comment was minimized by the moderator on the site
Sub AddNewRow()


Private Sub CommandButton1_Click()

ActiveSheet.Unprotect Password:="1234"


Dim mySheets

Dim i As Long


mySheets = Array("Sheet2")


For i = LBound(mySheets) To UBound(mySheets)

With Sheets(mySheets(i))

.Range("B10").EntireRow.Insert Shift:=xlDown

.Range("B10:H10").Borders.Weight = xlThin

End With

Next i


ActiveSheet.Protect Password:="1234"


End Sub

I don't know if this will work for you. It worked quite well for me. I even left unprotected cells that you can input data and the formulas are still active. Took me a whole day to figure it out. replace "1234" with whatever password you feel like, "Sheet2" with the Sheet you are working with and input the range you want.
The code first unprotects the worksheet, adds row and protects the worksheet.
This comment was minimized by the moderator on the site
is it possible to create in a different sheet? I really need that
This comment was minimized by the moderator on the site
can possible insert multiple sheet row at one time click by this .
This comment was minimized by the moderator on the site
Hi,
The below code can help you solve the problem. Please have a try.

Private Sub CommandButton1_Click()
Dim xIntRrow As Integer
Dim rowNum As Integer
On Error Resume Next
rowNum = Application.InputBox(Prompt:="Enter Row Number where you want to add a row:", _
Title:="Kutools for excel", Type:=1)
xIntRrow = Application.InputBox(Prompt:="Type in the number of rows you want to insert", _
Title:="Kutools for excel", Type:=1)
Rows(rowNum + 1 & ":" & rowNum + 1).EntireRow.Resize(xIntRrow).Insert Shift:=xlShiftDown

End Sub
There are no comments posted here yet
Load More
Please leave your comments in English
Posting as Guest
×
Rate this post:
0   Characters
Suggested Locations