Skip i'r prif gynnwys

Sut i newid / golygu llinellau pwnc negeseuon a dderbyniwyd yn Outlook?

Er mwyn chwilio'n hawdd, bod yn gyson â chynnwys y neges, neu ddibenion eraill, efallai y bydd angen i chi olygu neu newid pynciau rhai negeseuon a dderbyniwyd yn Outlook. Serch hynny, ymddengys yn unman y gellir golygu neu newid y pynciau hyn. Mewn gwirionedd mae Microsoft Outlook yn cefnogi'r nodwedd hon, ac yma byddwn yn eich tywys i olygu neu newid pynciau negeseuon a dderbynnir yn rhwydd.

Newid / golygu llinell pwnc un e-bost yn Outlook

Newid / golygu llinell pwnc sawl e-bost yn Outlook


Tab Office - Galluogi Golygu a Phori Tabiau yn Microsoft Office, Gwneud Gwaith yn Awel
Kutools ar gyfer Outlook - Hwb Outlook gyda 100 + Nodweddion Uwch ar gyfer Effeithlonrwydd Superior
Rhowch hwb i'ch Outlook 2021 - 2010 neu Outlook 365 gyda'r nodweddion uwch hyn. Mwynhewch dreial cynhwysfawr am ddim 60 diwrnod a dyrchafwch eich profiad e-bost!

swigen dde glas saethNewid / golygu llinell pwnc un e-bost yn Outlook

Bydd y camau canlynol yn eich tywys i newid neu olygu llinell pwnc un e-bost yn gyflym yn Outlook. Gwnewch fel a ganlyn:

1. Yn y bost gweld, cliciwch ddwywaith i agor yr e-bost y byddwch chi'n newid ei linell bwnc.

2. Nawr mae'r e-bost yn agor yn y ffenestr Negeseuon. Cliciwch y botwm ar gornel dde isaf pennawd y neges i ehangu pennawd y neges. Gweler y screenshot:

Nodyn: Yn Outlook 2010 neu fersiwn gynharach, mae pennawd y neges yn cael ei ehangu yn ddiofyn, sgipiwch y cam hwn yn uniongyrchol.

.

3. Nawr mae pennawd y neges wedi'i ehangu. Golygwch linell y pwnc yn uniongyrchol, ac yna cliciwch ar y Save botwm. Gweler y screenshot:

Hyd yn hyn, rydych chi wedi newid / golygu llinell pwnc yr e-bost penodedig yn barod. Caewch y ffenestr Negeseuon yn ôl yr angen.


swigen dde glas saethNewid / golygu llinell pwnc sawl e-bost yn Outlook

Os bydd angen i chi newid llinellau pwnc sawl e-bost yn Outlook, bydd y dull uchod ychydig yn ddiflas. Yma, bydd y dull hwn yn eich tywys i newid gosodiad barn y ffolder, a golygu llinellau pwnc e-byst yn y Rhestr Negeseuon yn uniongyrchol. Gwnewch fel a ganlyn:

1. Yn y bost gweld, agor y ffolder sy'n cynnwys e-byst y byddwch chi'n newid eu llinellau pwnc, a chlicio Gweld > Gweld Gosodiadau. Gweler y screenshot:

2. Nawr bod y blwch deialog Gosodiadau Gweld Uwch yn dod allan, cliciwch y Lleoliadau eraill botwm. Gweler y screenshot:

3. Yn y blwch deialog Gosodiadau Eraill, edrychwch ar y Caniatáu golygu yn y gell opsiwn, ac yna cliciwch ar y OK botymau yn olynol i gau'r ddau flwch deialog.

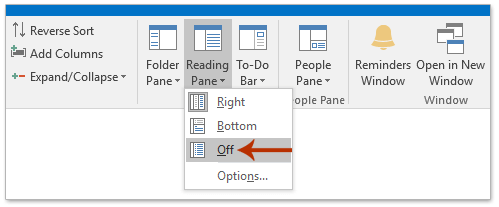
4. Nawr eich bod chi'n dychwelyd i'r ffolder, cliciwch Gweld > Pane Darllen > Oddi ar i gau'r cwarel darllen. Gweler y screenshot:
5. Nawr yn y Rhestr negeseuon, cliciwch y llinell pwnc rydych chi am ei newid, ac yna ei golygu'n uniongyrchol fel isod y llun a ddangosir.

Ac yna ailadroddwch y cam hwn i olygu llinellau pwnc sawl e-bost yn ôl yr angen.


Offer Cynhyrchiant Swyddfa Gorau

Kutools ar gyfer Rhagolwg - Dros 100 o Nodweddion Pwerus i Werthu Eich Outlook

🤖 Cynorthwy-ydd Post AI: E-byst pro ar unwaith gyda hud AI - un clic i atebion athrylith, tôn berffaith, meistrolaeth amlieithog. Trawsnewid e-bostio yn ddiymdrech! ...

📧 E-bostio Automation: Allan o'r Swyddfa (Ar gael ar gyfer POP ac IMAP)  /  Amserlen Anfon E-byst  /  Auto CC/BCC gan Reolau Wrth Anfon E-bost  /  Awto Ymlaen (Rheolau Uwch)   /  Auto Ychwanegu Cyfarchiad   /  Rhannwch E-byst Aml-Dderbynnydd yn Negeseuon Unigol yn Awtomatig ...

📨 Rheoli E-bost: Dwyn i gof E-byst yn Hawdd  /  Rhwystro E-byst Sgam gan Bynciau ac Eraill  /  Dileu E-byst Dyblyg  /  Chwilio Manwl  /  Cydgrynhoi Ffolderi ...

📁 Ymlyniadau ProArbed Swp  /  Swp Datgysylltu  /  Cywasgu Swp  /  Auto Achub   /  Datgysylltiad Auto  /  Cywasgiad Auto ...

🌟 Rhyngwyneb Hud: 😊Mwy o Emojis Pretty a Cŵl   /  Rhowch hwb i'ch Cynhyrchiant Outlook gyda Golygfeydd Tabbed  /  Lleihau Outlook Yn lle Cau ...

???? Rhyfeddodau un clic: Ateb Pawb ag Ymlyniadau Dod i Mewn  /   E-byst Gwrth-Gwe-rwydo  /  🕘Dangos Parth Amser yr Anfonwr ...

👩🏼‍🤝‍👩🏻 Cysylltiadau a Chalendr: Swp Ychwanegu Cysylltiadau O E-byst Dethol  /  Rhannwch Grŵp Cyswllt i Grwpiau Unigol  /  Dileu Atgoffa Pen-blwydd ...

Dros Nodweddion 100 Aros Eich Archwiliad! Cliciwch Yma i Ddarganfod Mwy.


Comments (24)
No ratings yet. Be the first to rate!
This comment was minimized by the moderator on the site
I'm aware that the date, time and such columns as those cannot be edited, but I've viewed a tutorial where a "Notes" column can be inserted and edited to contain notes the user wishes to see.  Unfortunately, my Outlook 365 allows me to add the column, and to enter edit mode, but it will not take any data ... I get an error tone.  There must be many other columns that allow the user to enter or edit data, or ... ?
This comment was minimized by the moderator on the site
Is there a way to add the same text to the beginning of all the subject lines all at once rather than needing to insert the text one at a time?  If so, can this be done with using VBA or a third-party app?
This comment was minimized by the moderator on the site
This is a huge game-changer for me. Thank you so much!!! It's a happy day! :-)
This comment was minimized by the moderator on the site
could i change date or time of incomming emails?

could i change reciefed from or sent to inthe header?

thanks
This comment was minimized by the moderator on the site
Hi Panama Smaek,
I am afraid it is impossible to change some message header information of an incoming email, such as from, to, sent time etc.
Here is a roundabout trick to change them: click to open the email in the Message window, click Message > Actions > Resent This Message, and then change the from, to as you need. And finally, save the message without sending.
This comment was minimized by the moderator on the site
Having Conversation View on is the reason Subject Lines weren't editable. When I uncheck the box in View > "Show as Conversations", I'm able to edit. However, this poses a different problem - I heavily depend on viewing my emails as Conversations. Setting this view back on, now every newly changed email shows the old subject line text. Is there a way to enforce the new subject line text for Conversations?
This comment was minimized by the moderator on the site
Step 5 is missing information. I've followed every instruction exactly; my Outlook looks just like the screen shots here. "Now in the Message List, please click the subject line you want to change, and then edit it directly as below screenshot shown" - How do you get an email Subject Line into edit mode? Selecting an email in Message List does nothing but select/highlight it. Double-clicking opens it into separate window. Right-clicking shows no option for editing. F2 shortcut on a highlighted/selected line does nothing. Just start typing - nothing. ... I'm using Office 2016. Thanks
This comment was minimized by the moderator on the site
Hi, at work we use Outlook 2010. I have tried and tried, I do change the subject of the messages, but but in the MESSAGE LIST the subject is the original one while in the READING PANEL the subject is the one I have changed. So the change is not exactly complete. I have visited other help options sites and no way, the result is always the same: subject changed in the READING PANEL and unchanged in the MESSAGE LIST. Thanks anyway.
This comment was minimized by the moderator on the site
It is because it is showing as a conversation. Remove conversation and it should work
This comment was minimized by the moderator on the site
This was great! thanks for the clear instructions
This comment was minimized by the moderator on the site
Thanks for this but my colleague, Stacey, has a strange error in that the Subject Line looks to be read only - can't edit it at all when you open the email into its own window. I understand this isn't the Microsoft site, but wondering if you would know why this is (haven't found a matching error on google yet). All our other colleagues (including myself) can open the email and edit as desired.
This comment was minimized by the moderator on the site
Please ignore - finally found out what was going on and she's sorted now
This comment was minimized by the moderator on the site
Tania, can you explain what you did to fix this. I have someone who is having the same problem.
This comment was minimized by the moderator on the site
When it says make sure you can see all of the header information, in step 2 above, we didn't have it expanded properly. The email she was working on had the window positioned so the right hand side was off the screen and she didn't see the drop down expand symbol. So I wrote my first message here thinking it was something different when it was really the same thing. Then we tried with a different email that was centered and we could see where to fix. Hope this helps :)
This comment was minimized by the moderator on the site
Oh thank you so much, this has been driving me crazy and Microsoft and even outlook help was zero help. Your pics also made it a breeze. I fee like I have won a lottery!
There are no comments posted here yet
Load More
Please leave your comments in English
Posting as Guest
×
Rate this post:
0   Characters
Suggested Locations