Sut i argraffu pob atodiad mewn un e-bost / lluosog yn Outlook?
Fel y gwyddoch, dim ond pan fyddwch chi'n clicio ar y bydd yn argraffu'r cynnwys e-bost fel pennawd, corff Ffeil > print yn Microsoft Outlook, ond nid argraffu'r atodiadau. Yma byddwn yn dangos i chi sut i argraffu pob atodiad mewn e-bost dethol yn gartrefol yn Microsoft Outlook.
- Argraffwch bob atodiad mewn un neges e-bost fesul un
- Argraffu swp pob atodiad mewn un neges e-bost
- Argraffu swp yr holl atodiadau a lluniau mewn negeseuon e-bost dethol lluosog
- Argraffu swp yr holl atodiadau mewn negeseuon e-bost dethol lluosog ac eithrio lluniau yn y corff
Argraffwch bob atodiad mewn un neges e-bost fesul un
Mae Microsoft Outlook yn darparu Argraffu Cyflym nodwedd, a all eich helpu i argraffu atodiadau mewn neges e-bost fesul un.
1. Dewiswch y neges e-bost y byddwch chi'n argraffu ei atodiadau yn nes ymlaen.
2. Cliciwch un atodiad yn yr e-bost hwn.

3. Cliciwch y Argraffu Cyflym botwm yn y Camau Gweithredu grŵp ar y Ymlyniadau tab.
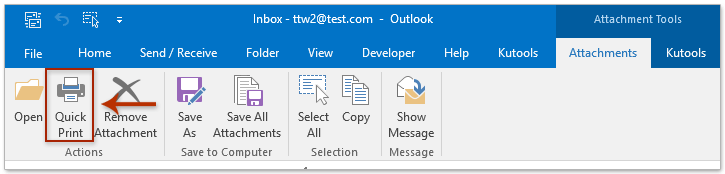
Sylwch: mae'r Offer Ymlyniad ni fydd yn cael ei actifadu nes i chi glicio atodiadau mewn e-byst.
4. Mae deialog Agor Ymlyniad Post yn dod allan, a chliciwch ar y agored botwm.
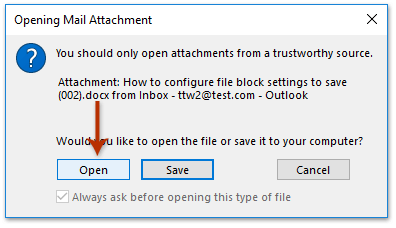
Sylwch y bydd y cam hwn yn agor yr atodiad a ddewiswyd, ac yn argraffu'r atodiad dethol hwn ar yr un pryd.
I argraffu atodiadau eraill yn yr e-bost hwn, ailadroddwch Gam 2 i Gam 4.
Cadw / allforio pob atodiad yn gyflym o sawl e-bost yn Outlook
Fel rheol gallwn arbed atodiadau o un e-bost trwy actifadu'r Offer Ymlyniad a chymhwyso'r Arbedwch yr holl Atodiadau nodwedd yn Outlook. Ond, beth os arbed atodiadau o negeseuon e-bost lluosog, neu o'r ffolder post cyfan yn Outlook? Rhowch gynnig ar Kutools ar gyfer Outlook's Arbed i Bawb Nodwedd (Atodiadau).
Argraffu swp pob atodiad mewn un neges e-bost
Os oes llawer o atodiadau yn yr un neges e-bost, bydd yn cymryd llawer o amser i'w hargraffu fesul un. A bydd y dull canlynol yn eich arwain trwy argraffu swp yr holl atodiadau mewn neges e-bost a ddewiswyd yn hawdd.
1. Dewiswch y neges e-bost y byddwch chi'n argraffu ei atodiadau yn nes ymlaen.
2. Yn Outlook 2010 neu fersiynau diweddarach, cliciwch y Ffeil > print > Dewisiadau Argraffu. Gweler y screenshot canlynol:
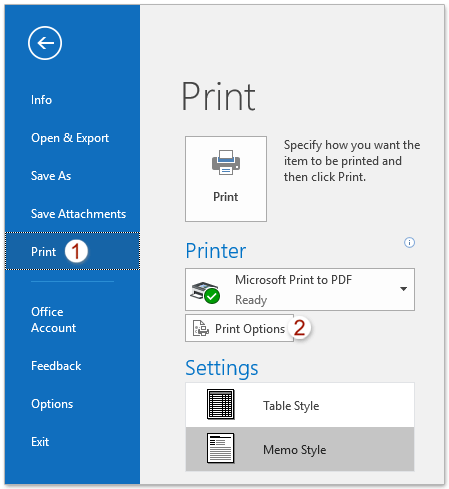
3. Yn y Argraffu blwch deialog, gwiriwch y Argraffu ffeiliau atodedig. Bydd atodiadau'n argraffu i'r argraffydd rhagosodedig yn unig opsiwn yn y Argraffu opsiynau adran hon.
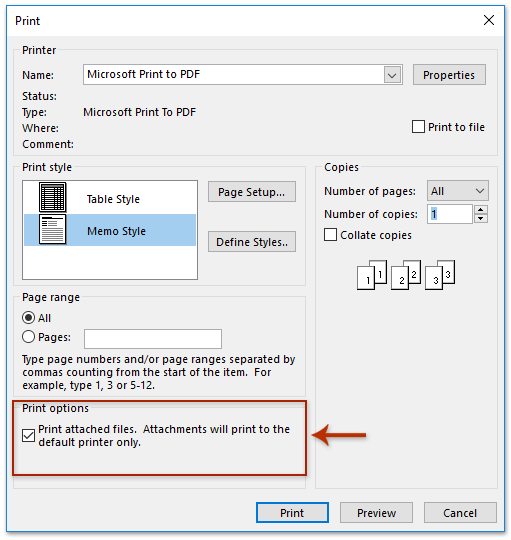
4. Cliciwch y print botwm.
5. Yn y blwch deialog popio allan Ymlyniad Post Agoriadol, cliciwch ar y agored botwm i fynd ymlaen. (Nodyn: Bydd y blwch deialog hwn yn popio allan ar gyfer pob atodiad ar wahân.)
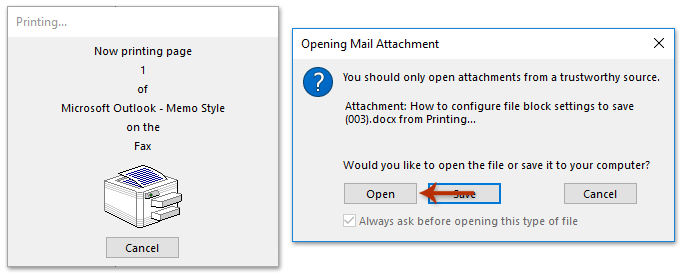
Nawr bydd yr holl atodiadau yn y neges e-bost hon a ddewiswyd yn cael eu hargraffu ar unwaith.
Argraffu swp yr holl atodiadau a lluniau mewn negeseuon e-bost dethol lluosog
I argraffu pob atodiad mewn negeseuon e-bost lluosog yn ogystal â'r holl luniau yn y corff neges yn Outlook, dilynwch y camau isod i gymhwyso cod VBA.
1. Yn y rhestr bostio, daliwch os gwelwch yn dda Ctrl or Symud allweddi i ddewis e-byst lluosog y byddwch yn argraffu eu hatodiadau.
2. Gwasgwch Alt + F11 allweddi gyda'i gilydd i agor ffenestr Microsoft Visual Basic for Applications.
3. Yn ffenestr Microsoft Visual Basic for Applications, cliciwch offer > Cyfeiriadau. Ac yna gwiriwch y Amser Rhedeg Sgriptio Microsoft opsiwn fel y dangosir isod. Ar ôl gorffen, cliciwch OK.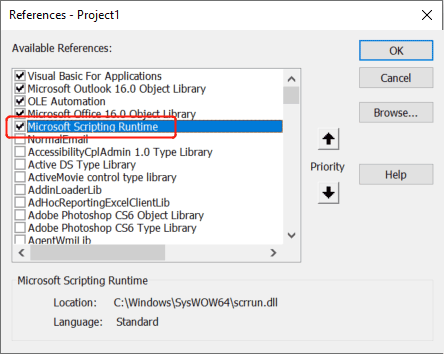
4. Cliciwch Mewnosod > Modiwlau, ac yna pastiwch islaw cod VBA i mewn i ffenestr y modiwl newydd.
VBA: Argraffwch bob atodiad mewn sawl e-bost Outlook
Sub PrintAllAttachmentsInMultipleMails()
  'Update by ExtendOffice 2022/08/03
  Dim xShellApp As Object
  Dim xFSO As Scripting.FileSystemObject
  Dim xItem As Object
  Dim xTempFldPath, xFilePath As String
  Dim xSelItems As Outlook.Selection
  Dim xMailItem As Outlook.MailItem
  Dim xAttachments As Outlook.Attachments
  Dim xAttachment As Outlook.Attachment
  Dim xFile As File
  On Error Resume Next
  Set xFSO = New Scripting.FileSystemObject
  xTempFldPath = xFSO.GetSpecialFolder(2).Path & "\Attachments " & Format(Now, "yyyymmddhhmmss") 'xFSO.GetSpecialFolder(2) For saving temporary files
  If xFSO.FolderExists(xTemfldpath) = False Then 'create temporary folder
    xFSO.CreateFolder (xTempFldPath)
  End If
  Set xSelItems = Outlook.ActiveExplorer.Selection
  Set xShellApp = CreateObject("Shell.Application")
  For Each xItem In xSelItems
    If xItem.Class = OlObjectClass.olMail Then
      Set xMailItem = xItem
      Set xAttachments = xMailItem.Attachments
      For Each xAttachment In xAttachments
        xFilePath = xTempFldPath & "\" & xAttachment.FileName
        xAttachment.SaveAsFile (xFilePath)
      Next
    End If
  Next
  For Each xFile In xFSO.GetFolder(xTempFldPath).Files
    VBA.DoEvents
    Call xShellApp.ShellExecute(xFile.Path, "", "", "print", 0)
  Next
  Set xSelItems = Nothing
  Set xShellApp = Nothing
  Set xFSO = Nothing
End Sub
5. Gwasgwch F5 allwedd neu cliciwch y Run botwm i redeg y cod VBA hwn. Nawr fe welwch fod yr holl atodiadau yn y negeseuon e-bost a ddewiswyd a'r lluniau yn y corff meesage wedi'u hargraffu.
Nodyn:
- Bydd pob delwedd yn dod â blwch deialog pop-up i ofyn am gadarnhad argraffu. Tra bydd mathau eraill o ffeiliau yn cael eu hargraffu'n uniongyrchol.
- Os oes delweddau mewn llofnod e-bost, byddant yn dod â blychau deialog naid i fyny hefyd.
- Os cewch Mae'r macros yn y prosiect hwn wedi'u hanalluogi gwall, gwiriwch y tiwtorial hwn: Sut i Alluogi Ac Analluogi Macros Yn Outlook?
Argraffu swp yr holl atodiadau mewn negeseuon e-bost dethol lluosog ac eithrio lluniau yn y corff
I argraffu atodiadau mewn e-byst lluosog yn unig ond y lluniau yn y corff neges yn Outlook, dilynwch y camau isod i gymhwyso cod VBA.
1. Yn y rhestr bostio, daliwch os gwelwch yn dda Ctrl or Symud allweddi i ddewis e-byst lluosog y byddwch yn argraffu eu hatodiadau.
2. Gwasgwch Alt + F11 allweddi gyda'i gilydd i agor ffenestr Microsoft Visual Basic for Applications.
3. Yn ffenestr Microsoft Visual Basic for Applications, cliciwch offer > Cyfeiriadau. Ac yna gwiriwch y Amser Rhedeg Sgriptio Microsoft opsiwn fel y dangosir isod. Ar ôl gorffen, cliciwch OK.
4. Cliciwch Mewnosod > Modiwlau, ac yna pastiwch islaw cod VBA i mewn i ffenestr y modiwl newydd.
VBA: Argraffwch bob atodiad mewn sawl e-bost Outlook
Sub PrintAllAttachmentsInMultipleMails()
  'Update by ExtendOffice 2022/08/05
  Dim xShellApp As Object
  Dim xFSO As Scripting.FileSystemObject
  Dim xItem As Object
  Dim xTempFldPath, xFilePath As String
  Dim xSelItems As Outlook.Selection
  Dim xMailItem As Outlook.MailItem
  Dim xAttachments As Outlook.Attachments
  Dim xAttachment As Outlook.Attachment
  Dim xFile As File
  On Error Resume Next
  Set xFSO = New Scripting.FileSystemObject
  xTempFldPath = xFSO.GetSpecialFolder(2).Path & "\Attachments " & Format(Now, "yyyymmddhhmmss") 'xFSO.GetSpecialFolder(2) For saving temporary files
  If xFSO.FolderExists(xTemfldpath) = False Then 'create temporary folder
    xFSO.CreateFolder (xTempFldPath)
  End If
  Set xSelItems = Outlook.ActiveExplorer.Selection
  Set xShellApp = CreateObject("Shell.Application")
  For Each xItem In xSelItems
    If xItem.Class = OlObjectClass.olMail Then
      Set xMailItem = xItem
      Set xAttachments = xMailItem.Attachments
      For Each xAttachment In xAttachments
        If IsEmbeddedAttachment(xAttachment) = False Then
          xFilePath = xTempFldPath & "\" & xAttachment.FileName
          xAttachment.SaveAsFile (xFilePath)
          Debug.Print xFilePath
        End If
      Next
    End If
  Next
  For Each xFile In xFSO.GetFolder(xTempFldPath).Files
    VBA.DoEvents
    Call xShellApp.ShellExecute(xFile.Path, "", "", "print", 0)
  Next
  Set xSelItems = Nothing
  Set xShellApp = Nothing
  Set xFSO = Nothing
End Sub

Function IsEmbeddedAttachment(Attach As Attachment)
Dim xItem As MailItem
Dim xCid As String
Dim xID As String
Dim xHtml As String
On Error Resume Next
IsEmbeddedAttachment = False
Set xItem = Attach.Parent
If xItem.BodyFormat <> olFormatHTML Then Exit Function
xCid = ""
xCid = Attach.PropertyAccessor.GetProperty("http://schemas.microsoft.com/mapi/proptag/0x3712001F")
If xCid <> "" Then
    xHtml = xItem.HTMLBody
    xID = "cid:" & xCid
    If InStr(xHtml, xID) > 0 Then
        IsEmbeddedAttachment = True
    End If
End If
End Function
5. Gwasgwch F5 allwedd neu cliciwch y Run botwm i redeg y cod VBA hwn. Nawr fe welwch fod yr holl atodiadau yn y negeseuon e-bost a ddewiswyd wedi'u hargraffu.
Nodyn:
- Bydd pob delwedd atodedig yn dod â blwch deialog naid i ofyn am gadarnhad argraffu. Tra bydd mathau eraill o ffeiliau yn cael eu hargraffu'n uniongyrchol.
- Ni fydd delweddau yng nghorff y neges yn cael eu hargraffu.
- Os cewch Mae'r macros yn y prosiect hwn wedi'u hanalluogi gwall, gwiriwch y tiwtorial hwn: Sut i Alluogi Ac Analluogi Macros Yn Outlook?
Demo: argraffu un neu'r cyfan o atodiadau mewn e-bost Outlook
Tip: Yn y Fideo hwn, Kutools tab yn cael ei ychwanegu gan Kutools ar gyfer Rhagolwg. Os oes ei angen arnoch, cliciwch yma i gael treial am ddim 60 diwrnod heb gyfyngiad!
Offer Cynhyrchiant Swyddfa Gorau
Kutools ar gyfer Rhagolwg - Dros 100 o Nodweddion Pwerus i Werthu Eich Outlook
🤖 Cynorthwy-ydd Post AI: E-byst pro ar unwaith gyda hud AI - un clic i atebion athrylith, tôn berffaith, meistrolaeth amlieithog. Trawsnewid e-bostio yn ddiymdrech! ...
📧 E-bostio Automation: Allan o'r Swyddfa (Ar gael ar gyfer POP ac IMAP) / Amserlen Anfon E-byst / Auto CC/BCC gan Reolau Wrth Anfon E-bost / Awto Ymlaen (Rheolau Uwch) / Auto Ychwanegu Cyfarchiad / Rhannwch E-byst Aml-Dderbynnydd yn Negeseuon Unigol yn Awtomatig ...
📨 Rheoli E-bost: Dwyn i gof E-byst yn Hawdd / Rhwystro E-byst Sgam gan Bynciau ac Eraill / Dileu E-byst Dyblyg / Chwilio Manwl / Cydgrynhoi Ffolderi ...
📁 Ymlyniadau Pro: Arbed Swp / Swp Datgysylltu / Cywasgu Swp / Auto Achub / Datgysylltiad Auto / Cywasgiad Auto ...
🌟 Rhyngwyneb Hud: 😊Mwy o Emojis Pretty a Cŵl / Rhowch hwb i'ch Cynhyrchiant Outlook gyda Golygfeydd Tabbed / Lleihau Outlook Yn lle Cau ...
???? Rhyfeddodau un clic: Ateb Pawb ag Ymlyniadau Dod i Mewn / E-byst Gwrth-Gwe-rwydo / 🕘Dangos Parth Amser yr Anfonwr ...
👩🏼🤝👩🏻 Cysylltiadau a Chalendr: Swp Ychwanegu Cysylltiadau O E-byst Dethol / Rhannwch Grŵp Cyswllt i Grwpiau Unigol / Dileu Atgoffa Pen-blwydd ...
Dros Nodweddion 100 Aros Eich Archwiliad! Cliciwch Yma i Ddarganfod Mwy.

