Sut i argraffu atodiadau yn awtomatig pan fydd e-byst yn cyrraedd Outlook?
Mae'r tiwtorial hwn yn dangos dull o gyfuno sgript VBA a rheol Outlook i'ch helpu chi i argraffu atodiadau o e-byst penodol yn awtomatig pan fyddant yn cyrraedd Outlook.
Argraffwch atodiadau yn awtomatig pan fydd rhai e-byst penodol yn cyrraedd
Gan dybio, rydych chi am argraffu atodiadau e-byst sy'n dod i mewn gan anfonwr penodol yn awtomatig. Gallwch chi wneud fel a ganlyn i'w gyflawni.
Cam 1: Creu sgript yn Outlook
Yn gyntaf, mae angen i chi greu sgript VBA yn Outlook.
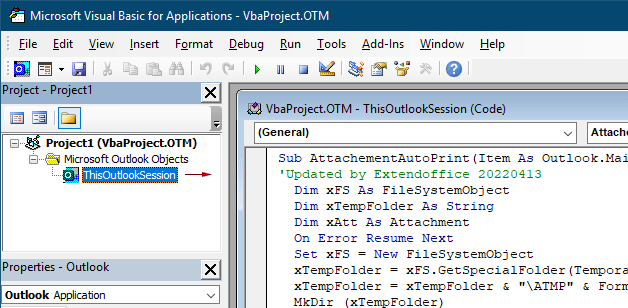
1. Lansio eich Rhagolwg, pwyswch y Alt + F11 allweddi ar yr un pryd i agor y Microsoft Visual Basic ar gyfer Ceisiadau ffenestr.
2. Yn y Microsoft Visual Basic ar gyfer Ceisiadau ffenestr, cliciwch ddwywaith ar Project1 > Gwrthrychau Microsoft Outlook > SesiwnOutlook i agor y ThisOutlookSession (Cod) ffenestr, ac yna copïwch y cod canlynol i'r ffenestr cod hon.
Cod VBA 1: Argraffu atodiadau yn awtomatig (pob math o atodiadau) pan fydd e-byst yn cyrraedd
Sub AttachementAutoPrint(Item As Outlook.MailItem)
'Updated by Extendoffice 20230223
  Dim xFS As FileSystemObject
  Dim xTempFolder As String
  Dim xAtt As Attachment
  Dim xShell As Object
  Dim xFolder As Object, xFolderItem As Object
  Dim xFileName As String
  On Error GoTo xError
  If Item.Attachments.Count = 0 Then Exit Sub
  Set xFS = New FileSystemObject
  xTempFolder = xFS.GetSpecialFolder(TemporaryFolder)
  xTempFolder = xTempFolder & "\ATMP" & Format(Item.ReceivedTime, "yyyymmddhhmmss")
  If Not xFS.FolderExists(xTempFolder) Then
    MkDir (xTempFolder)
  End If
  Set xShell = CreateObject("Shell.Application")
  Set xFolder = xShell.NameSpace(0)
  For Each xAtt In Item.Attachments
    If IsEmbeddedAttachment(xAtt) = False Then
      xFileName = xTempFolder & "\" & xAtt.FileName
      xAtt.SaveAsFile (xFileName)
      Set xFolderItem = xFolder.ParseName(xFileName)
      xFolderItem.InvokeVerbEx ("print")
    End If
  Next xAtt
  Set xFS = Nothing
  Set xFolder = Nothing
  Set xFolderItem = Nothing
  Set xShell = Nothing
xError:
  If Err <> 0 Then
    MsgBox Err.Number & " - " & Err.Description, , "Kutools for Outlook"
    Err.Clear
  End If
Exit Sub
End Sub

Function IsEmbeddedAttachment(Attach As Attachment)
Dim xItem As MailItem
Dim xCid As String
Dim xID As String
Dim xHtml As String
On Error Resume Next
IsEmbeddedAttachment = False
Set xItem = Attach.Parent
If xItem.BodyFormat <> olFormatHTML Then Exit Function
xCid = ""
xCid = Attach.PropertyAccessor.GetProperty("http://schemas.microsoft.com/mapi/proptag/0x3712001F")
If xCid <> "" Then
    xHtml = xItem.HTMLBody
    xID = "cid:" & xCid
    If InStr(xHtml, xID) > 0 Then
        IsEmbeddedAttachment = True
    End If
End If
End Function
Nodyn: Mae'r cod hwn yn cefnogi argraffu pob math o atodiadau a dderbynnir mewn e-byst. Os ydych chi am argraffu'r math penodedig o atodiad yn unig, fel ffeiliau pdf, cymhwyswch y cod VBA canlynol.
Cod VBA 2: Argraffwch yn awtomatig y math penodedig o atodiadau pan fydd e-byst yn cyrraedd
Sub AttachementAutoPrint(Item As Outlook.MailItem)
'Updated by Extendoffice 20230223
  Dim xFS As FileSystemObject
  Dim xTempFolder As String
  Dim xAtt As Attachment
  Dim xShell As Object
  Dim xFolder As Object, xFolderItem As Object
  Dim xFileType As String, xFileName As String
  On Error GoTo xError
  If Item.Attachments.Count = 0 Then Exit Sub
  Set xFS = New FileSystemObject
  xTempFolder = xFS.GetSpecialFolder(TemporaryFolder)
  xTempFolder = xTempFolder & "\ATMP" & Format(Item.ReceivedTime, "yyyymmddhhmmss")
  If Not xFS.FolderExists(xTempFolder) Then
    MkDir (xTempFolder)
  End If
  Set xShell = CreateObject("Shell.Application")
  Set xFolder = xShell.NameSpace(0)
  For Each xAtt In Item.Attachments
    If IsEmbeddedAttachment(xAtt) = False Then
      xFileName = xAtt.FileName
      xFileType = LCase$(Right$(xFileName, VBA.Len(xFileName) - VBA.InStrRev(xFileName, ".")))
      xFileName = xTempFolder & "\" & xFileName
      Select Case xFileType
        Case "pdf"   'change "pdf" to the file extension you want to print
          xAtt.SaveAsFile (xFileName)
          Set xFolderItem = xFolder.ParseName(xFileName)
          xFolderItem.InvokeVerbEx ("print")
      End Select
    End If
  Next xAtt
  Set xFS = Nothing
  Set xFolder = Nothing
  Set xFolderItem = Nothing
  Set xShell = Nothing
xError:
  If Err <> 0 Then
    MsgBox Err.Number & " - " & Err.Description, , "Kutools for Outlook"
    Err.Clear
  End If
  Exit Sub
End Sub

Function IsEmbeddedAttachment(Attach As Attachment)
Dim xItem As MailItem
Dim xCid As String
Dim xID As String
Dim xHtml As String
On Error Resume Next
IsEmbeddedAttachment = False
Set xItem = Attach.Parent
If xItem.BodyFormat <> olFormatHTML Then Exit Function
xCid = ""
xCid = Attach.PropertyAccessor.GetProperty("http://schemas.microsoft.com/mapi/proptag/0x3712001F")
If xCid <> "" Then
    xHtml = xItem.HTMLBody
    xID = "cid:" & xCid
    If InStr(xHtml, xID) > 0 Then
        IsEmbeddedAttachment = True
    End If
End If
End Function
Nodiadau:
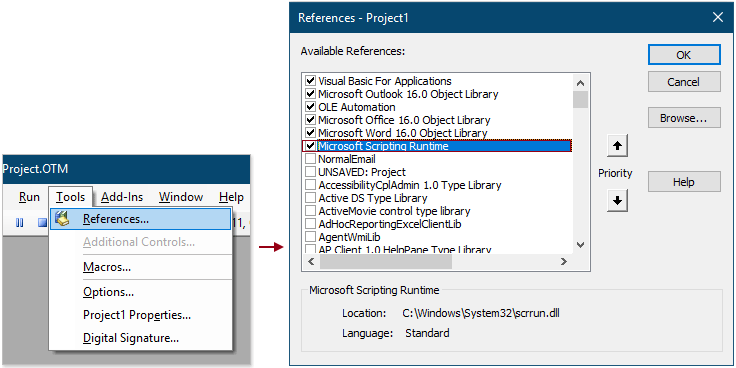
3. Ewch ymlaen a chliciwch offer > Cyfeiriadau. Yn y popping up Cyfeiriadau – Prosiect1 blwch deialog, gwiriwch y Amser Rhedeg Sgriptio Microsoft blwch, ac yna cliciwch ar y OK botwm.
4. Cadwch y cod a gwasgwch y Alt + Q allweddi i gau'r Microsoft Visual Basic ar gyfer Ceisiadau ffenestr.
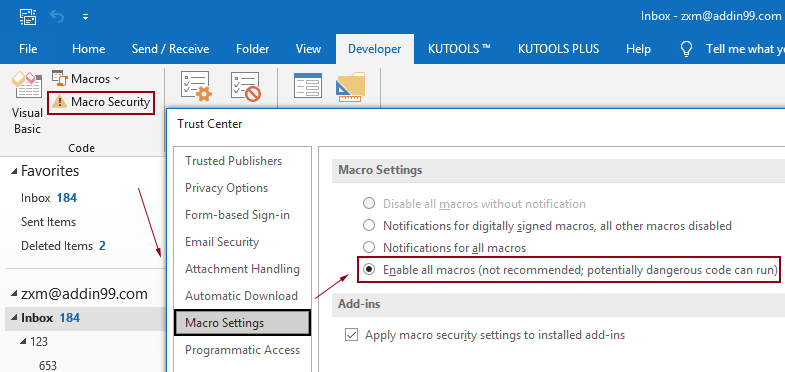
Nodyn: Gwnewch yn siŵr bod y Galluogi pob macros opsiwn wedi'i alluogi yn eich Outlook. Gallwch wirio'r opsiwn hwn trwy ddilyn y camau a ddangosir isod.
Cam 2: Adeiladu rheol i ddefnyddio'r sgript
Ar ôl ychwanegu'r sgript VBA yn Outlook, mae angen i chi greu rheol i ddefnyddio'r sgript yn seiliedig ar amodau penodol.
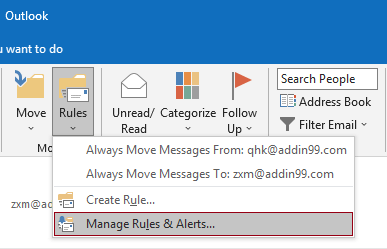
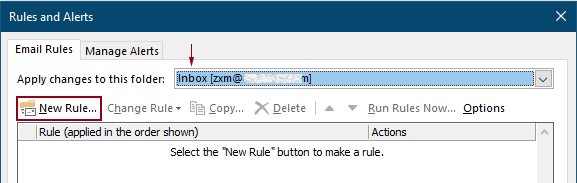
1. Ewch i'r tab Cartref, cliciwch Rheolau > Rheoli Rheolau a Rhybuddion.
2. Yn y Rheolau a Rhybuddion blwch deialog, cliciwch y Rheol Newydd botwm i greu rheol.
Awgrym: Os ydych wedi ychwanegu cyfrifon e-bost lluosog at eich Outlook, nodwch gyfrif yn y Cymhwyso newidiadau i'r ffolder hon gwymplen lle rydych chi am gymhwyso'r rheol. Fel arall, bydd yn cael ei gymhwyso i fewnflwch y cyfrif e-bost a ddewiswyd ar hyn o bryd.
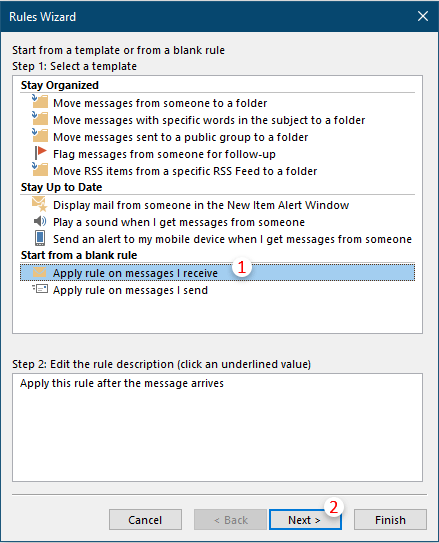
3. Yn y cyntaf Dewin Rheolau blwch deialog, dewiswch Gwnewch gais ar y negeseuon a gefais yn y 1 cam blwch, ac yna cliciwch Nesaf.
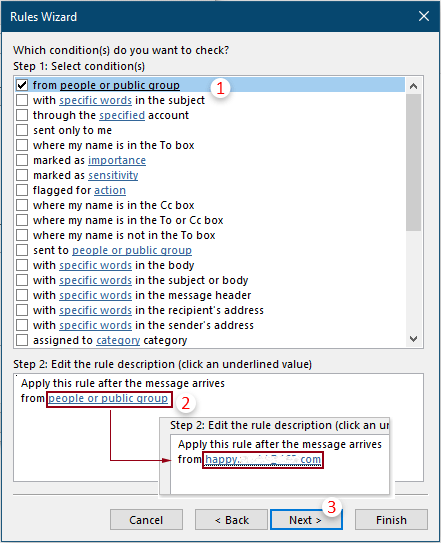
4. Yn yr ail Dewin Rheolau blwch deialog, mae angen i chi:
5. Yn y trydydd Dewin Rheolau blwch deialog, mae angen i chi ffurfweddu fel a ganlyn.
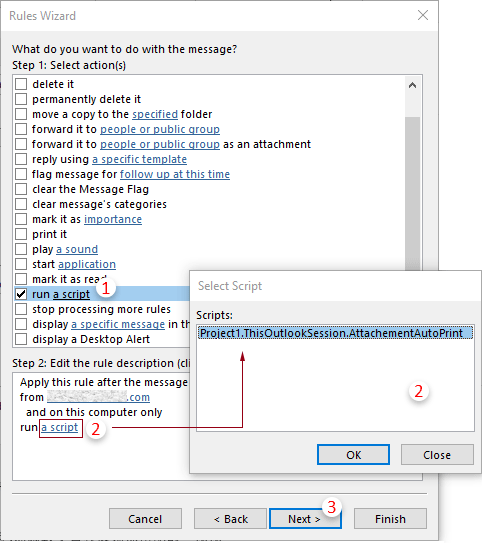
Awgrym: Os yw'r “rhedeg sgript” opsiwn ar goll yn eich Dewin Rheolau, gallwch ei arddangos trwy ddilyn y dull a grybwyllir yn yr erthygl hon: adfer ar goll Run A Script pption yn Outlook rheol.
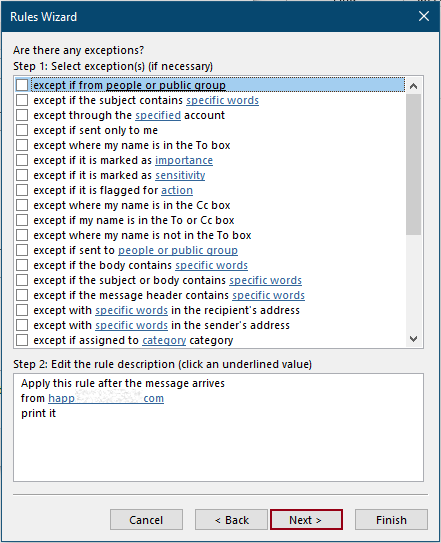
6. Yna un arall Dewin Rheolau pops i fyny yn gofyn am eithriadau. Gallwch ddewis yr eithriadau os oes angen, fel arall, cliciwch ar y Digwyddiadau botwm heb unrhyw ddewisiadau.
7. Yn yr olaf Dewin Rheolau, mae angen i chi nodi enw ar gyfer y rheol, ac yna cliciwch ar y Gorffen botwm.
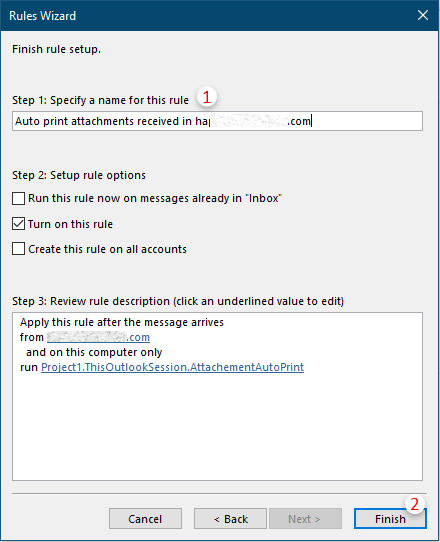
8. Yna mae'n dychwelyd i'r Rheolau a Rhybuddion blwch deialog, gallwch weld y rheol a grewyd gennych a restrir y tu mewn, cliciwch ar y OK botwm i orffen y gosodiadau cyfan.
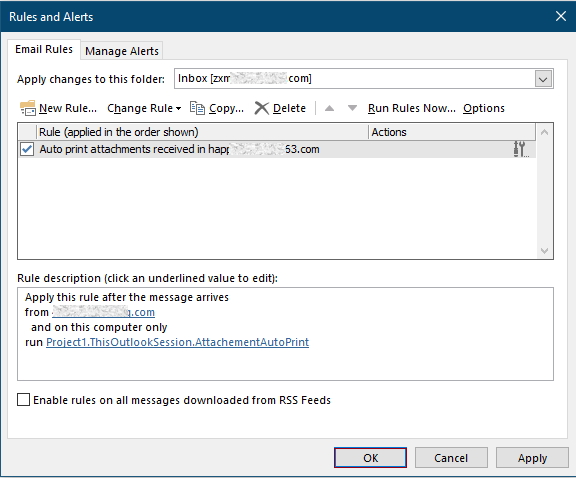
O hyn ymlaen, pan dderbynnir e-bost gan y person penodedig, bydd y ffeiliau atodedig yn cael eu hargraffu'n awtomatig.
Erthyglau perthnasol
Dim ond Argraffu Atodiad(S) O Un E-bost Neu E-byst Dethol Yn Outlook
Yn Outlook, gallwch chi argraffu'r negeseuon e-bost, ond a ydych chi wedi argraffu'r atodiadau o un e-bost yn unig neu e-byst dethol yn Outlook? Mae'r erthygl hon yn cyflwyno'r triciau ar ddatrys y swydd hon.
Dim ond Argraffu Pennawd Neges E-bost Yn Outlook
Wrth argraffu e-bost yn Outlook, bydd yn argraffu pennawd neges a chorff neges yn yr e-bost. Fodd bynnag, mewn rhai achosion arbennig, efallai y bydd angen i chi argraffu pennawd y neges gyda'r pwnc, anfonwr, derbynwyr, ac ati Bydd yr erthygl hon yn cyflwyno dau ateb i'w wneud.
Argraffu Calendr Mewn Ystod Dyddiad Penodedig / Cwsmer Yn Outlook
Fel arfer, wrth argraffu calendr yn Month view yn Outlook, bydd yn dewis y mis sy'n cynnwys y dyddiad a ddewiswyd ar hyn o bryd yn awtomatig. Ond, efallai y bydd angen i chi argraffu'r calendr o fewn ystod dyddiad arferol, megis 3 mis, hanner y flwyddyn, ac ati Bydd yr erthygl hon yn cyflwyno'r ateb i chi.
Argraffu Cyswllt Gyda Llun Yn Outlook
Fel rheol, ni fydd llun cyswllt yn cael ei argraffu wrth argraffu'r cyswllt yn Outlook. Ond weithiau, bydd yn fwy trawiadol argraffu cyswllt gyda'i lun. Bydd yr erthygl hon yn cyflwyno rhai cylchoedd gwaith i'w gyflawni.
Argraffu Detholiad O E-bost Yn Outlook
Pe byddech chi'n derbyn neges e-bost ac wedi darganfod bod yna ddetholiad o'r cynnwys e-bost mae angen ei argraffu yn lle argraffu'r neges gyfan, beth fyddech chi'n ei wneud? Mewn gwirionedd, gall Outlook eich helpu i gyflawni'r llawdriniaeth hon gyda chymorth porwyr rhyngrwyd, fel y Firefox a'r Internet Explorer. Yma, byddaf yn cymryd y porwyr Rhyngrwyd er enghraifft. Edrychwch ar y tiwtorialau canlynol.
Offer Cynhyrchiant Swyddfa Gorau
Kutools ar gyfer Rhagolwg - Dros 100 o Nodweddion Pwerus i Werthu Eich Outlook
🤖 Cynorthwy-ydd Post AI: E-byst pro ar unwaith gyda hud AI - un clic i atebion athrylith, tôn berffaith, meistrolaeth amlieithog. Trawsnewid e-bostio yn ddiymdrech! ...
📧 E-bostio Automation: Allan o'r Swyddfa (Ar gael ar gyfer POP ac IMAP) / Amserlen Anfon E-byst / Auto CC/BCC gan Reolau Wrth Anfon E-bost / Awto Ymlaen (Rheolau Uwch) / Auto Ychwanegu Cyfarchiad / Rhannwch E-byst Aml-Dderbynnydd yn Negeseuon Unigol yn Awtomatig ...
📨 Rheoli E-bost: Dwyn i gof E-byst yn Hawdd / Rhwystro E-byst Sgam gan Bynciau ac Eraill / Dileu E-byst Dyblyg / Chwilio Manwl / Cydgrynhoi Ffolderi ...
📁 Ymlyniadau Pro: Arbed Swp / Swp Datgysylltu / Cywasgu Swp / Auto Achub / Datgysylltiad Auto / Cywasgiad Auto ...
🌟 Rhyngwyneb Hud: 😊Mwy o Emojis Pretty a Cŵl / Rhowch hwb i'ch Cynhyrchiant Outlook gyda Golygfeydd Tabbed / Lleihau Outlook Yn lle Cau ...
???? Rhyfeddodau un clic: Ateb Pawb ag Ymlyniadau Dod i Mewn / E-byst Gwrth-Gwe-rwydo / 🕘Dangos Parth Amser yr Anfonwr ...
👩🏼🤝👩🏻 Cysylltiadau a Chalendr: Swp Ychwanegu Cysylltiadau O E-byst Dethol / Rhannwch Grŵp Cyswllt i Grwpiau Unigol / Dileu Atgoffa Pen-blwydd ...
Dros Nodweddion 100 Aros Eich Archwiliad! Cliciwch Yma i Ddarganfod Mwy.

