Sut i gael gwared ar gyfrif ond cadw ei e-byst yn Outlook?
Dychmygwch eich bod wedi sefydlu cyfrifon e-bost lluosog yn Microsoft Outlook, ond darganfyddwch mai anaml y byddwch yn defnyddio rhai ohonynt. Efallai y byddwch yn ystyried dileu'r cyfrifon llai gweithredol hyn. Yn nodweddiadol, mae dileu cyfrif e-bost o Microsoft Outlook hefyd yn dileu ei negeseuon e-bost cysylltiedig. Fodd bynnag, bydd yr erthygl hon yn eich arwain trwy wahanol dechnegau i ddileu cyfrifon e-bost o Microsoft Outlook wrth gadw eu negeseuon.
- Awtomeiddio e-bostio gyda Auto CC / BCC, Auto Ymlaen gan reolau; anfon Ymateb Auto (Allan o'r Swyddfa) heb fod angen gweinydd cyfnewid...
- Cael nodiadau atgoffa fel Rhybudd BCC wrth ymateb i bawb tra'ch bod ar restr BCC, a Atgoffwch Wrth Ymlyniadau ar Goll am atodiadau anghofiedig...
- Gwella effeithlonrwydd e-bost gyda Ateb (Pawb) Gydag Atodiadau, Ychwanegu Cyfarchiad neu Dyddiad ac Amser yn Awtomatig i'r Llofnod neu'r Pwnc, Ateb E-byst Lluosog...
- Symleiddio e-bostio gyda E-byst Dwyn i gof, Offer Ymlyniad (Cywasgu Pawb, Auto Save All...), Tynnwch y Dyblygion, a Adroddiad Cyflym...
Dileu cyfrif ond cadw ei e-bost trwy arbed ffeil ddata wreiddiol
Bydd y dull hwn yn eich tywys i dynnu cyfrif e-bost o Microsoft Outlook, ond cadwch bob eitem o'r cyfrif e-bost hwn yn Microsoft Outlook.
Nodyn Pwysig: Mae'r weithdrefn hon wedi'i chynllunio ar gyfer cyfrifon e-bost sy'n defnyddio ffeiliau data .pst. Os yw'ch cyfrif yn gweithredu ar ffeiliau .ost, sicrhewch trosi a'u hallforio fel .pst yn gyntaf. Mae'r cam hwn yn hanfodol i osgoi colli unrhyw ddata e-bost pan fyddwch chi'n bwrw ymlaen â dileu'r cyfrif.
- Agorwch y cyfrif Gosodiadau blwch deialog trwy glicio Ffeil > Gwybodaeth > cyfrif Gosodiadau > cyfrif Gosodiadau.

- Yn y cyfrif Gosodiadau blwch ymgom, ar y E-bostiwch tab, dilynwch y camau hyn:
- Dewiswch y cyfrif e-bost y byddwch yn ei ddileu. Sicrhewch fod y cyfrif a ddewiswch yn gysylltiedig â ffeil ddata .pst. Os yw'n gysylltiedig â ffeil .ost, gallai dileu'r cyfrif arwain at golli pob e-bost.
- Cliciwch ar y Dileu botwm.
- Cliciwch ar y Cau botwm ar y gwaelod i adael y blwch deialog.

- Nawr rydych chi'n ôl i brif ryngwyneb Outlook. Cliciwch Ffeil > Agored ac Allforio > Agor Ffeil Data Outlook.
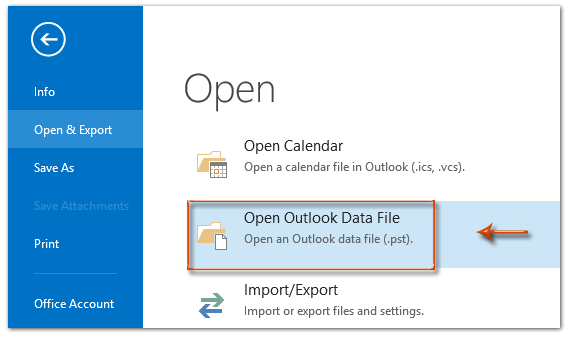
- Yn y pop-up Agor Ffeil Data Outlook ffenestr, lleolwch y ffeil ddata yr hoffech ei chyrchu. Dewiswch ef, ac yna cliciwch ar y agored botwm. Tip: Os yw'ch ffeil .pst yn cael ei storio mewn lleoliad nad yw'n ddiofyn, ewch i'r ffolder penodol hwnnw i agor y ffeil .pst.

Canlyniad
Mae'r cyfrif e-bost bellach wedi'i dynnu o'ch Microsoft Outlook; fodd bynnag, mae'r ffolderi sy'n gysylltiedig â'r cyfrif hwn yn parhau i fod yn weladwy ac yn hygyrch yn y cwarel Navigation.
Tynnwch gyfrif ond cadwch ei e-bost trwy gopïo a gludo
Mewn gwirionedd, cyn tynnu cyfrif e-bost o Microsoft Outlook, gallwn arbed ei holl e-byst i ffolderi eraill trwy gopïo a gludo â llaw. Dyma ganllaw manwl i wneud hyn:
- Agorwch y ffolder e-bost yn y Cwarel Navigation sy'n gysylltiedig â'r cyfrif rydych chi'n bwriadu ei ddileu sy'n cynnwys yr e-byst rydych chi am eu cadw.

- Pwyswch Ctrl + A i ddewis yr holl negeseuon e-bost yn y ffolder a agorwyd.
- Pwyswch Ctrl + C i gopïo'r negeseuon e-bost hyn.
- Llywiwch i'r ffolder lle rydych am drosglwyddo'r e-byst hyn. Yn fy enghraifft, byddwn yn agor y Mewnflwch o gyfrif e-bost gwahanol fel y dangosir isod.

- Pwyswch Ctrl + V i gludo'r holl negeseuon e-bost a gopïwyd i'r ffolder hon sydd wedi'i hagor.
Awgrym:
- Ailadroddwch gamau 1 i 5 i symud negeseuon e-bost o ffolderi eraill y cyfrif rydych chi'n ei ddileu.
- Nid yw'r dull hwn yn cynnwys is-ffolderi. Ar gyfer negeseuon e-bost mewn is-ffolderi, bydd angen i chi ailadrodd camau 1 i 5 ar gyfer pob is-ffolder.
- Agorwch y cyfrif Gosodiadau blwch deialog trwy glicio Ffeil > Gwybodaeth > cyfrif Gosodiadau > cyfrif Gosodiadau.
- Yn y cyfrif Gosodiadau blwch ymgom, ar y E-bostiwch tab, dilynwch y camau hyn:
- Dewiswch y cyfrif e-bost y byddwch yn ei ddileu.
- Cliciwch ar y Dileu botwm.
- Cliciwch ar y Cau botwm ar y gwaelod i adael y blwch deialog.

Allforio e-byst i ffeil PST cyn tynnu cyfrif
I gadw e-byst o gyfrif rydych chi'n ei ddileu yn Outlook, mae eu hallforio fel PST (Outlook Data File) yn ddull dibynadwy. Mae'r broses hon yn creu copi wrth gefn o'ch negeseuon e-bost, y gellir eu cyrchu hyd yn oed ar ôl i'r cyfrif gael ei ddileu. Dyma sut i'w wneud:
- Agorwch y Dewin Mewnforio ac Allforio blwch deialog trwy glicio Ffeil > Agored ac Allforio > Mewnforio ac Allforio.
- Yn y dewin, dewiswch Allforio i ffeil, a chliciwch ar y Digwyddiadau botwm.

- Yn y Allforio i Ffeil blwch deialog, dewiswch Ffeil Data Camre (.pst) > Digwyddiadau.

- Yn y Allforio Ffeil Data Rhagolwg blwch deialog, dewiswch y cyfrif e-bost y byddwch yn tynnu yn ddiweddarach i allforio ei ddata, sicrhau Cynnwys is-ddosbarthwyr yn cael ei wirio, a chlicio Digwyddiadau.

- Gosod paramedrau allforio fel a ganlyn:
- Cliciwch Pori, dewiswch ffolder i achub y ffeil PST, ac enwch y ffeil.
- Dewiswch y Peidiwch ag allforio eitemau dyblyg opsiwn.
- Cliciwch Gorffen.

- Mae adroddiadau Creu Ffeil Data Outlook bydd deialog yn ymddangos:
- I ychwanegu cyfrinair, rhowch ef yn y ddau cyfrinair ac Gwirio Cyfrinair blychau, yna cliciwch OK.
- I hepgor ychwanegu cyfrinair, cliciwch Diddymu.

Ar ôl cwblhau'r camau hyn, gallwch chi bwrw ymlaen â'r weithdrefn a amlinellwyd yn y dull cychwynnol i ddileu cyfrif e-bost presennol tra'n cadw'r e-byst gwreiddiol.
Offer Cynhyrchiant Swyddfa Gorau
Kutools ar gyfer Rhagolwg - Dros 100 o Nodweddion Pwerus i Werthu Eich Outlook
🤖 Cynorthwy-ydd Post AI: E-byst pro ar unwaith gyda hud AI - un clic i atebion athrylith, tôn berffaith, meistrolaeth amlieithog. Trawsnewid e-bostio yn ddiymdrech! ...
📧 E-bostio Automation: Allan o'r Swyddfa (Ar gael ar gyfer POP ac IMAP) / Amserlen Anfon E-byst / Auto CC/BCC gan Reolau Wrth Anfon E-bost / Awto Ymlaen (Rheolau Uwch) / Auto Ychwanegu Cyfarchiad / Rhannwch E-byst Aml-Dderbynnydd yn Negeseuon Unigol yn Awtomatig ...
📨 Rheoli E-bost: Dwyn i gof E-byst yn Hawdd / Rhwystro E-byst Sgam gan Bynciau ac Eraill / Dileu E-byst Dyblyg / Chwilio Manwl / Cydgrynhoi Ffolderi ...
📁 Ymlyniadau Pro: Arbed Swp / Swp Datgysylltu / Cywasgu Swp / Auto Achub / Datgysylltiad Auto / Cywasgiad Auto ...
🌟 Rhyngwyneb Hud: 😊Mwy o Emojis Pretty a Cŵl / Rhowch hwb i'ch Cynhyrchiant Outlook gyda Golygfeydd Tabbed / Lleihau Outlook Yn lle Cau ...
???? Rhyfeddodau un clic: Ateb Pawb ag Ymlyniadau Dod i Mewn / E-byst Gwrth-Gwe-rwydo / 🕘Dangos Parth Amser yr Anfonwr ...
👩🏼🤝👩🏻 Cysylltiadau a Chalendr: Swp Ychwanegu Cysylltiadau O E-byst Dethol / Rhannwch Grŵp Cyswllt i Grwpiau Unigol / Dileu Atgoffa Pen-blwydd ...
Dros Nodweddion 100 Aros Eich Archwiliad! Cliciwch Yma i Ddarganfod Mwy.

